If you're new to Python
and VPython see more
Help at glowscript.org
Pictures of 3D objects
text |
 |
See the Text Output discussion for additional ways to output text in the GlowScript environment.
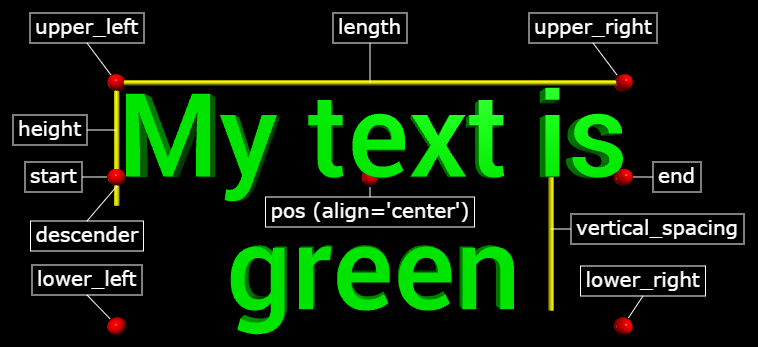
With the text object you can display 3D text. The green 3D text shown above was created with the following statement:
T = text(text='My text is\ngreen',
align='center', color=color.green)
Labels were added to the display above to illustrate some of the main attributes of the text object. Whether you extrude into or out of the screen, the text is created so that it is readable left to right from the normal viewing position, in the +z direction.
Limitations: It is important to know that this 3D text object is very complex and expensive to display, nor can you modify the letters displayed once the object has been created. If for example you want to display rapidly changing text, use the label object (displayed in front of the canvas) or the wtext object (displayed above the canvas as part of the title or below the canvas as part of the caption). Also see the section "Displaying text" of the canvas documentation.
Currently this 3D text object does not handle HTML options, such as bold, italic, subscript, or superscript. The label and wtext objects do however support these options.
3D text is made out of quads and triangles which are then made into a compound object for speed of display. You can make additional copies of a text object by cloning it. You can move the text by specifying a new pos, and you can change its axis, up, color, opacity, shininess, and emissive, as with other objects, but note that color and size are "multiplicative"; see compound.
The 3D text object does not have a size attribute. Instead, the size of the display is specified by height, length and depth as discussed below.
Here is a list of text attributes, in addition to the usual attributes of canvas, color, shininess, and opacity (but not texture or bumpmap, currently):
pos The location of the baseline of the text, to the left, to the right, or at the center of the text, as per align.
align Specify 'left' (default), 'right', or 'center'.
text The text to be displayed, such as "My text is\ngreen" in the example above ('\n' is a new-line character). Unicode strings are supported. After creating the object, the text is read-only -- it cannot be changed. The reason for this is that it takes a significant portion of a second to create a 3D text object. If you need to change the text, make the current object invisible (visible=False) and create a new object. The text need not be a string; it can be anything that you could print.
height Height of an uppercase letter (see above); default is 1. Specifying the height when creating the text object sets the scale for the entire text display. After creating the 3D text, you can change the height of the object. For example, if you say T.height = 0.5*T.height, the letters become shorter but the length stays the same. Changing the height also changes descent and vertical_spacing.
length length of the displayed text. You cannot specify a length when creating the 3D text, but you can change this later. For example, if you say T.length = 0.5*T.length, the letters become narrower but the height stays the same.
depth Depth of the text; the default is 0.2 times the height when creating the 3D text. A positive number means extrude toward you, out of the screen; negative means extrude away from you, into the screen. After creating the 3D text, you can change this. For example, if you say T.depth = 2*T.depth, the letters become twice as thick. If the depth is zero, the thickness is made to be 0.01 times the height, and the text looks like a thin sheet.
font Name of the desired font, either "sans" (sans serif, the default) or "serif". This is read-only.
billboard In computer graphics "billboard" behavior means that the object always faces you, no matter how you reorient the camera. Specifying billboard = True when creating the text turns this on, and then is read-only. Because lighting changes as you rotate the camera, you may wish to specify emissive = True, so that the text is always bright.
color The color of the text.
start_face_color and end_face_color By default,the starting and ending faces are given the same color as the rest of the text, as specified by color, but you can specify that other colors be used for the starting or ending face of the extruded text.
show_start_face and show_end_face By default, these attributes are True and the start and end faces of the extruded text are displayed. If you set one of these to False, that face is left open.
descender Height of the descender on lower-case letters such as y (whether or not there is such a letter in the text). This is typically about 0.3 times the height. This is read-only but is affected by changes in height.
upper_left, upper_right, lower_right, lower_left The bounding box of the displayed text; all of these are read-only. For example, if you create title = text(text="My Text"), you can place a sphere at the upper left corner with the statement sphere(pos=title.upper_left). See the screen display above.
start, end The left-most and right-most locations on the baseline. These are read-only. If align is 'left', pos is the same as start. If align is 'right', pos is the same as end.
vertical_spacing Vertical distance from one baseline to the next in a multiline text. This is read-only.
axis The axis points along the baseline; changing the axis changes the orientation of text. The default is vector(1,0,0), with text going toward the right. Changing the axis only affects the direction of the line of text, not the length or size.
up Controls the up attribute of the text; changing up makes the text tip away from the vertical.