If you're new to Python
and VPython see more
Help at glowscript.org
Pictures of 3D objects
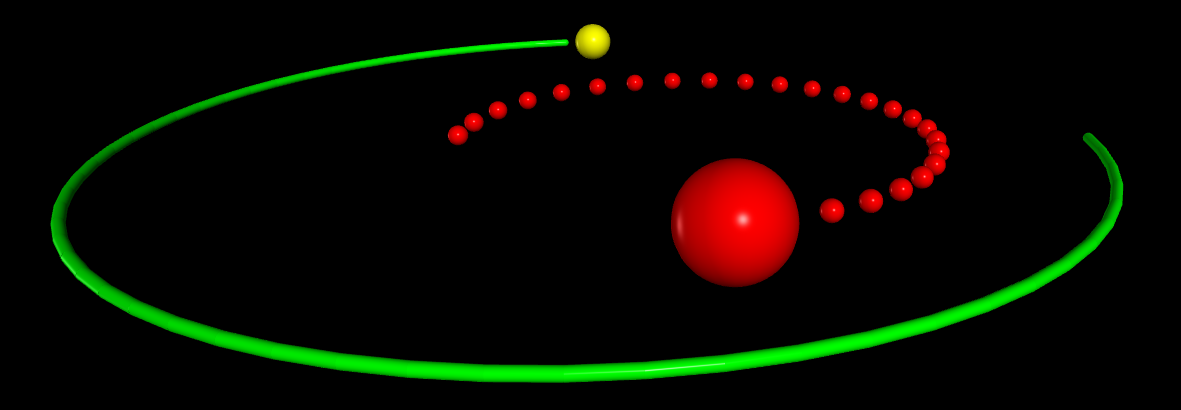
This article emphasizes the simple "make_trail" mechanism for leaving a trail behind a moving object, as shown in the image above. Also see the articles below on attach_trail and attach_arrow.
make_trail
You can leave a trail behind a moving object simply by specifying make_trail=True:
ball = sphere(make_trail=True)
Each time the scene is rendered, the new position ball.pos is added to a curve, thereby leaving a trail behind the moving sphere. This works with arrow, box, cone, cylinder, ellipsoid, pyramid, ring, and sphere.
You can specify using a points object rather than a curve object for displaying the trail, and you can specify how many points to skip or retain:
ball = sphere(make_trail=True, trail_type="points",
interval=10, retain=50)
The trail of this sphere will show individual points rather than a continuous line, it will display spheres at every 10th sphere location, and it will retain only the most recent 50 of these points.
At any time during the moving of the object, you can specify ball.make_trail=False, in which case no more points are added to the ball's trail until you set ball.make_trail=True again (at which point a new trail is started at the ball's current position).
If you specify an interval (greater than zero) and do not specify a position when creating the ball, the first point along the trail will occur when a position is later assigned to the ball. If you do specify a position when creating the ball, and make_trail is True, the first point along the trail is that specified position. If no interval is specified, the curve starts with whatever the position is at the time of the first rendering of the scene.
Summary of make_trail
make_trail Must be mentioned when creating the moving object; if False, no points will be added to the trail until you say ball.make_trail = True (assuming the moving object is named ball)
trail_type Default is "curve", but can be "points"
interval If interval=10, a point is added to the trail only every 10th move of the object. If interval is 0, no trail is shown.
If trail_type is "points", the default interval = 1; interval must have a nonzero value because the points need to be accurately spaced in order to look right.
If trail_type is "curve" (the default), and no interval is specified, updates to the trail are made every time a new image is rendered, typically about 30 to 60 times a second. This usually looks fine.
pps If trail_type is "curve", and no interval is specified, pps=15 means "add a point to the curve approximately 15 times per second".
retain If retain=50, only the 50 most recently added points will be retained
trail_color The color of the curve or points (default is the object's color). If you change this during the motion, later portions of the trail will have this color.
trail_radius The radius of the curve or points. The default for the "curve" option is 0, which makes a thin curve (this works best in the xy plane; if it doesn't give the result you want, set trail_radius to the desired value).
The default for the "points" option is 0.2 times the radius, 0.1 times the height or size.y, of the size of the moving object at the time your create that object. If you don't assign your own size or radius to an object until after you've created it, you may also need to set trail_radius at that time. If you change trail_radius during the motion, later portions of the trail will have this radius.
clear_trail() Clears all points from the existing trail before adding more. Note that setting make_trail to False stops adding more points.
attach_trail is similar to the make_trail mechanism described above but includes the ability to specify an arbitrary function to be called to provide a position rather than using the position of an object. If an object is named "ball", the following statement will cause a curve to be drawn along the path of the moving object:
attach_trail(ball)
By default, the radius of the cross-section of the curve is 0.1 times the size.y of the object, and the color of the curve is the color of the object. You can change this:
attach_trail(ball, radius=0.1,
color=color.white )
You can also specify that only the most recent N points are displayed, which has the effect of giving the object something like a comet's tail:
attach_trail(ball, retain=30 )
By default, points are added to the trail every time the scene is rendered, which is typically about 30 times per second. No trail is started until you explicitly specify a position of the ball. You can limit the number of points per second ("pps") to be added to the trail. In the following case, 5 points are added to the trail per second (the maximum value of pps that makes sense is about 30):
attach_trail(ball, pps=5 )
By default, the trail is a curve (connected points), but you can make a trail of separated spheres:
attach_trail(ball, type='points' )
Instead of specifying an object whose position is used to add points to the curve or set of spheres, you can specify a function which yields a vector to be used as a position. If you have a function named "center" that returns a vector position, you can say this:
def center():
return (ball1.pos+ball2.pos)/2
attach_trail(center)
In summary, you can specify a trail to be constructed as a curve or a set of spheres, using the position of an object or the vector result of a function. You can specify options to control color, radius, retain, pps, and type. The default for the "curve" option is 0, which makes a thin curve (this works best in the xy plane; if it doesn't give the result you want, set trail_radius to the desired value). The default for the "points" option is 0.2 times the radius, 0.1 times the height or size.y, of the moving object. You can change color or radius and the following points will be displayed with the new attributes.
start, stop, clear
You can start and stop adding points to a trail, and you can clear the trail (remove the existing points):
b = attach_trail(ball)
...
b.stop()
...
b.start()
...
b.clear()
attach_arrow lets you specify a quantity and a scale factor to display an arrow at the location of a moving object. The following statement will automatically display a green arrow at the current location of the ball. The arrow will have shaftwidth=0.3, and its axis and length is determined by scale*ball.axis:
attach_arrow(ball, "axis", scale=1e3,
shaftwidth=0.3, color=color.green)
The default value of scale is 1, and the default color of the arrow is the color of the ball. You can specify any vector attribute of the moving object, not just "axis". For example, if you continually update a vector quantity ball.velocity and want to continually display an arrow representing this quantity at the location of the moving ball (with scale=1 and the color of the ball), just say this:
attach_arrow(ball, "velocity")
b = attach_arrow(ball)
...
b.stop()
...
b.start()