If you're new to Python
and VPython see more
Help at glowscript.org
Pictures of 3D objects
Simple 3D Programming Using VPython
I. Getting started
To write a VPython program in the browser, sign in at glowscript.org, click the link to your programs, then click Create New Program. A blank edit page will open with a header line that says something like "GlowScript 1.1 VPython". Start typing your program on the second line. Click "Run this program" to try out your program.
The canvas
When using VPython the canvas shows objects in 3D.
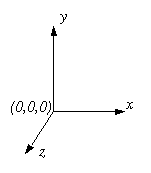
(0,0,0) is in the center of the canvas . The +x axis runs to the right, the +y axis runs up, and the +z axis points out of the screen, toward you.
x, y, and z are measured in whatever units you choose; the canvas is automatically scaled appropriately. (You could, for example, create a sphere with a radius of 1E-15 m to represent a nucleus, or a sphere with a radius of 1E6 m to represent a planet, though it wouldn't make sense to put both of these objects in the same canvas!)
The Output window
The output of any -print- statements you execute in your program goes to a scrolling text window underneath the graphics window. You can use this window to print values of variables, print lists, print messages, etc.
The Code window
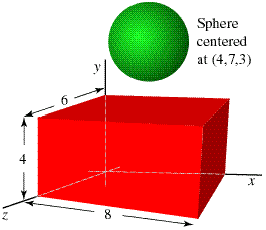
If you type or copy the following simple program into the program editor and run it (click "Run this program" or press Ctrl-1 or Ctrl-2), you will see a canvas like the one shown in the figure.
redbox=box(pos=vector(4,2,3),
size=vector(8,4,6),color=color.red)
ball=sphere(pos=vector(4,7,3),radius=2,color=color.green)

Viewing the scene
In the canvas, click and drag with the right mouse button (or hold down the Ctrl key while dragging). Drag left or right, and you rotate around the scene. To rotate around a horizontal axis, drag up or down. Click and drag up or down with the middle mouse button to move closer to the scene or farther away (on a 2-button mouse, hold down the left and right buttons; on a 1-button mouse, hold down the Alt key).
II. VPython Entities
Objects, names, and attributes
The graphical objects you create, such as spheres, boxes, and curves, continue to exist for the duration of your program, and the VPython 3D graphics module will continue to display them, wherever they are. You must give each object a name (such as redbox or ball in the example above) if you wish to refer to it again later in your program. All objects have attributes: properties like ball.pos (the position of the sphere), ball.color, and radius or other size parameter. If you change an attribute of an object, such as its position or color, VPython will automatically display the object in its new location, or with its new color.
You can set the values of attributes in the "constructor" (the code used to create the object), and you can also modify attributes later:
ball.radius = 2.2
In addition to the built-in set of attributes, you can create new attributes. For example, you might create a sphere named moon; in addition to its radius and location, you might give it attributes such as mass (moon.mass) and momentum (moon.momentum).
Vectors
Not all objects in VPython are visible objects. For example, VPython allows you to create 3D vector quantities, and to perform vector operations on them. If you create a vector quantity called a, you may refer to its components as a.x, a.y, and a.z. To add two vectors, a and b, however, you do not need to add the components one by one; VPython will do the vector addition for you:
a = vector(1,2,3)
b = vector(4,5,6)
c = a+b
If you include print(c), you will see that it is a vector with components (5, 7, 9.).
Scalar multiplication
d = 3*a # d is a vector with components (3, 6, 9)
Vector magnitude
s = mag(c) # s is a scalar
z = mag(c)**2 # you can square the magnitude of a vector
Vector products
f = cross(a,b) # cross product
g = dot(a,b) # dot product
h = norm(a) # normalized (unit) vector; a/mag(a)
The attributes of VPython objects can be vectors, such as velocity or momentum.
III. Simple Python Programming
Using the 3D Graphics Module
The necessary first line of your program is created for you, and looks like this, if the current version is 1.1:
GlowScript 1.1 VPython
Comments
A comment in a Python program starts with "#"
# this line is a comment
Variables
Variables can be created anywhere in a Python program, simply by assigning a variable name to a value. The type of the variable is determined by the assignment statement.
a = 3 # an integer
b = -2.5 # a floating-point number
c = vector(0.4, 3e3, -1e1) # a vector
Earth = sphere(pos=vector(0,0,0),
radius=6.4e6) # a 3D object
bodies = [ship, Earth, Moon]
# a list of objects
Basic VPython objects such as sphere() and box() have a set of "attributes" such as color, and you can define additional attributes such as mass or velocity. Other objects, such as vector(), have built-in attributes but you cannot create additional attributes.
Exponentiation
x**2 # Not x^2, which is a bit operation in Python
Logical Tests
# Note the obligatory indentation here.
if a == b: # note the double equal sign for "is equal"
c = 5 # executed if a is equal to b
d = 5*a # also executed if a is equal to b
elif a > 10: # a not equal to b but greater than 10
x = a+b
else: # any other case
x = b/a
Logical expressions
== |
equal |
!= |
not equal |
< |
less than |
> |
greater than |
<= |
less than or equal |
>= |
greater or equal |
or |
logical or |
and |
logical and |
in |
member of a sequence |
not in |
not sequence member |
Lists
A list is an ordered sequence of any kind of object. It is delimited by square brackets.
moons = [Io, Europa, Ganymede, Callisto]
The function "arange" (short for "arrayrange") creates an array of numbers:
angles = arange (0, 2*pi, pi/100)
# from 0 to 2*pi-(pi/100) in steps of (pi/100)
numbers = arange(10) # integer argument -> integers
print(numbers) # [0,1,2,3,4,5,6,7,8,9]
Loops
The simplest loop in Python is a "while" loop. The loop continues as long as the specified logical expression is true (note the obligatory indentation):
while x < 23:
x = x + vx*dt
To write an infinite loop, just use a logical expression that will always be true:
while True:
rate(30) # limit animation rate, render scene
ball.pos = ball.pos + (ball.momentum/ball.mass)*dt
Infinite loops are ok, because you can always interrupt the program by clicking "Edit this program". However, you MUST include a rate statement in the animation loop.
It is also possible to loop over the members of a sequence:
moons = [Io, Europa, Ganymede, Callisto]
for a in moons:
r = a.pos - Jupiter.pos
for x in arange(10):
# see "lists" above
...
for theta in arange(0., 2.*pi, pi/100.):
# see "lists" above
if a == b: continue # go back to the start of the loop
if a > b: break # exit the loop
Printing results
To print a number, a vector, a list, or anything else, use the "print" option:
print(Europa.momentum)
To print a text message, enclose it in quotes:
print("We crashed with speed", v, "m/s.")
This could also be done like this:
print("We crashed with speed {} m/s.".format(v))
More Information about Python
We have summarized a small but important subset of the Python programming language. Extensive Python information is available on the internet.